Peyote Beadwork
by Jerry Smith
originally
published as CIHA Indian Craft Series No. 1008
We would like to present a brief explanation on how to start to do peyote beadwork. This will provide you with only some initial information. For more detailed information see Ty Stewart’s articles “‘Peyote’ Beadwork” Part I Singing Wire January 1969 and “Peyote Beadwork” Part II AICC November 1969.
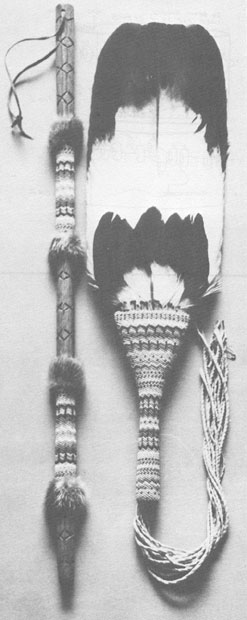
This style of beadwork known as “Peyote” beadwork or sometimes known as gourd stitch is employed as one means to decorate items of cylindrical shape such as fan handles, earrings, whistles, dance canes, staffs, etc. The effective use of color contrasts and rainbowed elements of the design make the finished product a curious wonder to those who are not familiar with this type of beadwork. It is almost impossible to diagram the designs used; therefore, we supply the photo above as an example of excellent peyote design and craftsmanship. Study the photo and practice creating some of the design elements and you will advance greatly.
How to Start
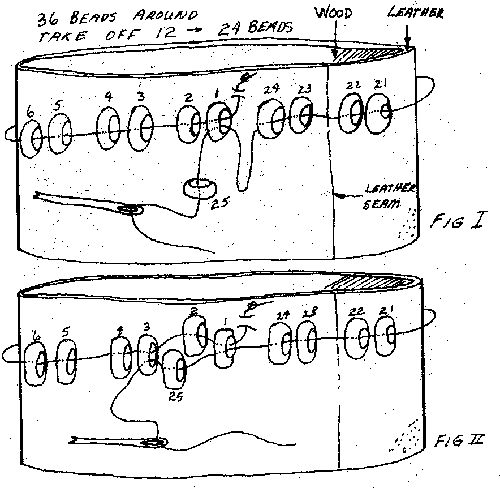
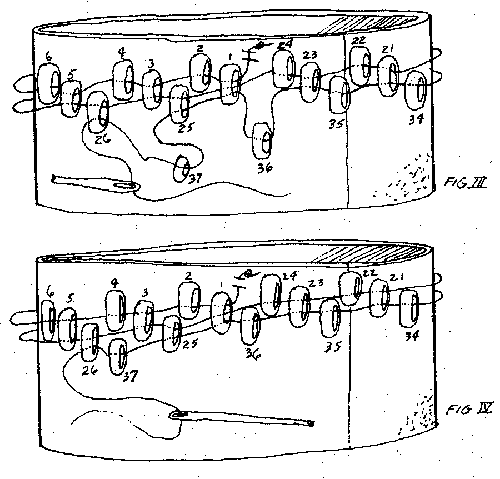
Glue leather around your object and trim off the excess. To start, push threaded needle through leather at top (or bottom) of object and string on some beads. Wind beads around the object so that they completely encircle the circumference, (Fig. I). Count the beads. If the number is not divisible by 6 add or subtract beads to arrive at a total divisible by 6 such as 18, 24, 30,36, etc. Next take off 1/3 of these beads. Put needle through bead # 1, the first bead you put on and then string on another bead marked “25,” Fig.I. Put needle through the 3rd bead, so that it lies between bead 2 & 3. Finish the row in this manner, putting on a bead and passing the needle through every other one. When you put on the last bead of this row #36 you will pass through bead #1 for the 3rd time. Fig 3. Then pass through bead “25”. You have now established the “three-drop” pattern. Continue by stringing a new bead and passing through the lowest bead. Fig 4. Keep your work tight but not extremely tight. Small cut (faceted) beads 16/0, 13/o, 12/o and small seed beads that are not cut are preferable.
We carry all the supplies you need for this craft project. Here are some quick links:
13/0 Charlotte Cut Beads
15/0 Charlotte Cut Beads
Beading Needles
Bees Wax
Nymo Bead Thread
Recommended Reading
Copyright © California Indian Hobbyist Association & Jerry Smith
Copyright © 2003-2019 Matoska Trading Company Inc