Beaded Pipebags
by Ron Clanton
originally
published as CIHA Indian Craft Series No. 1015
Many times I have been asked what a dancer should carry in his hands besides a pipebag. Old pipebags are very expensive and most hobbyists seem to be afraid of making one because the bead work looks very extensive, and most hobbyists don’t know how to do quill work. Not all pipebags need quill work to be good and the beading is no more than a pair of cuffs. The pipebag is an essential article owned by all men in pre-reservation days. The pipebag held his pipe, pipe tamp, tobacco and articles for igniting the tobacco.
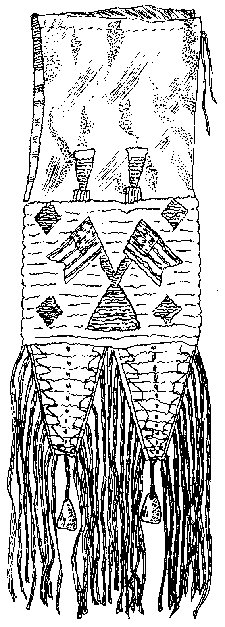
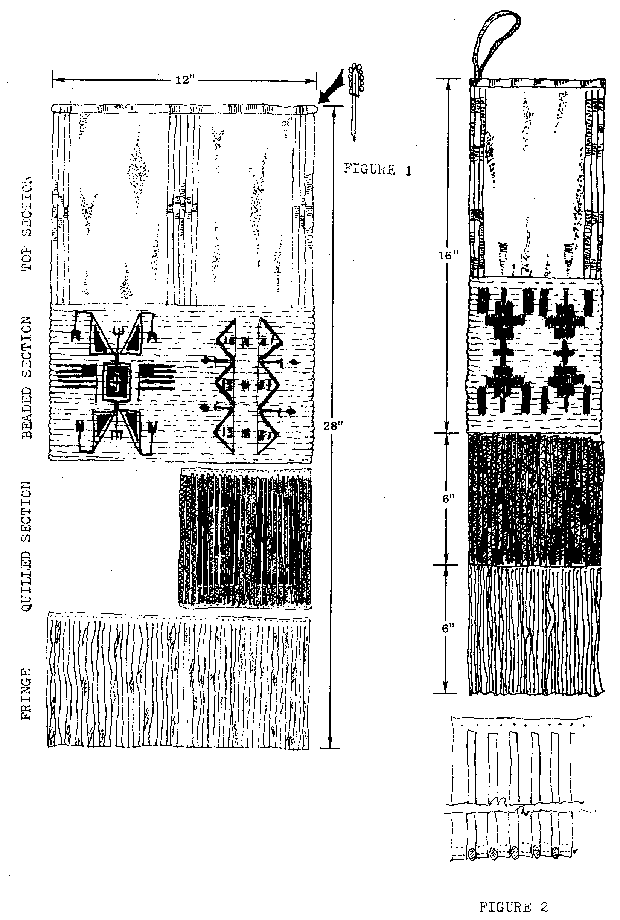
The construction of a pipebag is simple and not too expensive. The average pipebag was 6” wide and 24” or more long, and was divided into three or four areas (depending on if you have a quilled area). The top area is skin with bead trim, a beaded area, a quilled area, and fringe.
Starting at the top area, it has a strip of bead work which completely encircles the mouth of the pipebag. Only one-half of this strip is visible on the finished pipebag, as the top edge of the strip is folded into the bag and stitched down giving an appearance similar to a rope with beads (See figure I).
Along each side of the pipebag is a vertical strip of bead work connecting the bead work around the mouth of the pipebag with the main beaded section. These strips are usually composed of one, three, or five lanes of bead work. The middle lane on one side of the bag conceals the seam. The strip on the side without the seam appears to be optional. I have seen as many bags without this strip as with it. The majority of these bags tend to consist of designs of crosses or stylized crosses. These strips of bead work are always done in the lazy stitch method.
The designs on the main beaded section are usually different on front and back. By far the majority are done in lazy stitch method, but some with pictographs or flags, have small sections running in different directions, looking like applique. For designs and colors see Indian Craft Series number 1003, Traditional Sioux Beaded Cuffs.
The body of the quilled section is composed of a piece of rawhide which is split into narrow strips 1/3” to 1/4” wide. These strips are not completely separated from the main piece of rawhide. As the slits stop approximately 1/3” from the top of the piece of rawhid& (See Figure II). The porcupine quills are attached to the rawhide section by the wrapping method.
The strips are separated at the bottom by single beads (ed: “seed beads”) inserted sideways between the strips and secured by a single thread passing through both rawhide strip and bead, (See Figure II). The quilled section is then inserted approximately 1/3” between the front and back side of the beaded section. The two sections are then stitched together.
The fringe at the bottom of the bag is twice as wide as the bag itself for the fringe will be folded in half, in effect causing the fringe to double in thickness. The bottom of the quilled section is inserted approximately 1/3” between the fold at the top of the fringe and the two sections are stitched together. There are a few variations in design and construction, however, before making these variations research the article making sure that you are doing it right.
Sioux (Oglala)
South Dakota c.1900
We carry all the supplies you need for this craft project. Here are some quick links:
Commercial Tan Buckskin
Imitation Braintan Buckskin - Highly recommended for this project
Braintan Buckskin - Best material for this project
Genuine Sinew - For sewing up your bag - recommended material
Imitation Sinew
Seed Beads
Porcupine Quills
Rawhide Craft Bends - Good weight for quilled section
Copyright © California Indian Hobbyist Association & Ron Clanton
Copyright © 2003-2019 Matoska Trading Company Inc